Tuesday, May 27, 2014

Inspections 3 & 4

I've been a little behind with updating Sky Hive's blog lately.  Life has been a little crazy!  Nonetheless, I have been able to preform hive inspections but I haven't been able to blog about them. So let's get started!

Number 3 - May 16, 2014

Inspection #3 was very exciting.  As I previously discussed in Inspection #2, I saw a lot of newly capped brood cells, several stages of developing larvae, and many eggs.  With inspection #3, I was able to see newly hatched worker bees that had actually been produced from my queen! It was awesome!  The newly hatched bees are a lot more pale.  They are a light golden brown color. Clearly, a lot different compared to the bees that came with the package.

Newly emerging worker bees walking across the frames of Sky Hive for the first time.  Lightly golden brown, compared to their hive sisters who are darker colored.
Inspection #3 was also the first time I saw honey.  This frame was almost completely covered with pollen, which is contained primarily in the center and honey, which is primarily contained on the edges of the frame with white wax caps.
On this frame, you can see a few raised caps.  These raised caps contain drone brood, or male bees.  Male bees, or drone bees are most commonly seen within hives during the Spring and Summer seasons for mating purposes.  During the Fall and Winter most hives will not contain any drones. 
Another frame from the bottom most deep super.  This frame contains a lot of capped brood with some cells containing larvae and eggs.  Some cells are even empty, which most likely explains why I'm starting to see new worker bees.  Happy birthday to all the new girls!
Another capped brood frame with a few new worker bees among their older hive sisters.
A better picture of the newly emerging worker bees. Note how lightly colored they are compared to their older sisters.
When performing this inspection, I noticed the girls had drawn out almost six of the ten frames within the first deep super. Most beekeeping experts suggest you add a second deep super when the bees have drawn out at least seven of the ten frames.  I went ahead and added the second deep super just to be safe.  I figured it wouldn't hurt.

Inspection #4 - May 26, 2014

I'm not gonna lie, this inspection was a little bit harder to complete. Mostly, because there were about triple the amount of bees from last time which made me slightly nervous. In fact, I didn't even make it through the entire inspection. I was moving a lot slower compared to previous inspections and was cautiously replacing frames. With my luck, I was nervous about accidentally crushing the queen (I didn't)!  The girls even started bumping my veil about half way through the bottom most deep super, probably because I was taking too long and pushing their patience.  So I took their hint and closed up shop for the day. But, I was able to see that the queen had made her way up into the second deep super at some point.  The worker bees had drawn out only a couple of frames in the newly installed second deep super, but surprisingly enough, the queen has already began laying eggs on the frames.  I am very lucky to have obtained a well producing queen!  

One of the frames I pulled from the second deep super. Notice how new the honeycomb is.  You can tell this by how white and untouched it is.  After even a couple of weeks, a typical frame with comb will be slightly discolored and lightly brown.  from bees walking across the frame; just the normal wear and tear.  You can't really see them in this picture, but there were also eggs laid in these cells. 
A frame containing pollen (the darker colored cells without wax coverings) and honey which is to the far left of the picture (the white wax covered cells), notice how you can even see a little golden color under the wax coverings. Yes, that would be honey!!
Looking down into the first (most bottom) deep super.  You can see a little but of burr comb coming out from some frames.
Looking down into the first deep super.  Look #2!  There were so many bees.  It was slightly overwhelming!
This photo reveals a queen cup.  Of course, being a new beekeeper I panicked.  However, I was told a queen cup is nothing to worry about as long as the queen cup doesn't turn into a queen cell or a capped queen cell.  The queen cup is nothing but the bees being prepared.  In rare case that the current queen become sick, injured, or even if the colony feels overwhelmed or over populated, they are able to quickly produce a queen of their own.  Some people destroy the queen cups to prevent swarming or supercedure. However, I just left the queen cup alone. I will let nature do it's thing.  But, for now I will simply just cross my fingers and hope my colony doesn't swarm! This photo also shows some awesome close ups of larvae and pollen! Simply amazing.
A close up on a frame containing capped worker brood and larvae. Looking good, ladies!
Capped worker brood. The newly emerged worker bees from inspection #3 don't look so young anymore.  However, you can clearly see how different they look from their older worker sisters.
Some of the ladies hanging outside on a frame during the inspection.  I bought this handy frame holder to use during inspections. It holds only a few frames, however it makes it easier to manipulate frames inside each deep super. 
Looking down into the first deep super.  The hive population has certainly increased, which made it a little harder for this novice beekeeper to complete this inspection.  But, with more practice comes skill perfection. 
During inspection #4, I also removed the entrance reducer.  I posted a comment on a couple of the Beekeeping groups on Facebook looking for some advice on entrance reducer removal.  After reading a few responses, I decided to go ahead and remove it.  We will see how it goes!  

~Nick

Tuesday, May 6, 2014

Second Hive Inspection

Today, Anthony and I completed the second hive inspection.  Anthony mostly just took pictures and helped me clean up, but he was still very much appreciated! This was also his first time ever seeing the bees.  He actually thought it was pretty cool!

The second inspection went very well.  I was impressed to see lots of worker bees in several stages of development.  I saw eggs, larvae, and lots of capped brood!  The population at Sky Hive is rapidly increasing! The queen bee is certainly doing her job well. I was also able to spot the queen again during this inspection.  She appears to be doing well and looks healthy. I finally removed the sugar syrup from the hive as well. The bees did not even touch it.  I also added half of a new pollen/protein patty, considering they finally ate through the first one. I only had to kill two small hive beetles, hopefully they don't become a major problem.

I also snapped a few photos today to show off the inspection process and hive progress.  Enjoy!

Anthony took a photo of me holding up one of the frames covered in bees during the inspection.
A close up on another frame. 
Lots of capped brood in this photo, as well as larvae! 
A close up on one of the frames. Nectar, pollen, capped brood and larvae can be seen here.
Capped brood and larvae in different stages of development. 

~Nick

Friday, May 2, 2014

Silence of the Bees

A fascinating film about honey bees and their declining populations around the globe.  Definitely, worth watching.


~Nick

Tuesday, April 29, 2014

First Inspection, One Week After Package Installation

Today I completed my first hive inspection and it went very smoothly.  Not only did the colony successfully release the queen, but I actually had the chance to lay eyes on her as well!  Locating the queen on any hive inspection is basically the main objective.  I thought locating her the first time was going to be a little difficult, but she clearly stands out from the rest of the colony.  She was actually quite easy to spot!

Not only was the queen released, but she has also started to lay eggs. I saw quite a few of eggs in many of the cells, however thank god I didn't see any queen cups or queen cells. I also never saw any capped brood, but its still probably a little too early for that. I'm good with seeing eggs at this point, at least I know the queen is doing her job well!  Along with eggs, I saw a lot of nectar and stored pollen.  The bees appeared to have drawn out a total of three frames so far, not too bad.

I've also noticed the bees don't seem to favor the sugar syrup very much, considering they haven't really touched it at all. However, they are eating the pollen patty pretty well. Hopefully, more plants will bloom in the area, not too many flowers at this point around my parents' home.  They had a Crab Apple Tree, but most of the flowers have fallen off due to rain and storms.  However, there are some giant rose bushes that could be blooming any day now.  So I'm crossing my fingers!!

I was a bit nervous at first, because when I first walked out to the hive today, there weren't nearly as many bees on the front of the hive as usual.  But, it has also been a cloudy, overcast afternoon, with possible rain showers this evening. But during the inspection, it appeared that most of the bees were actually in the hive.  However, they remained very calm during the entire inspection. I never once felt threatened by the colony.

One of the ladies. I rescued her from the watering bowl outside the hive.  A little wet, but at least she survived the swim!
Looking down in between the frames during the inspection.  The ladies have drawn out almost three frames so far.  You can see the drawn out honeycomb from here.
One of the three frames I pulled out.  Some workers have full pollen baskets, others were cleaning out cells, some were even building new cells onto the foundation.  Very busy little ladies.
Another picture of a frame.  Between a couple of the workers, you can spot a cell with some orange pollen in it.
I completed the main objective during my first hive inspection: locating your queen.  She is definitely alive and well.  I spotted eggs in some of the cells during the inspection. She's clearly doing her job quite well.  Also notice how different the queen looks from all the other bees in this photo. Note her long, extended abdomen.  Almost her entire abdomen is filled with eggs, that explains her length. 
Another picture of the queen during the inspection.  Lots of nectar and pollen in cells in this photo as well.
Another photo of the queen on a frame.
The bees were building bridges during the inspection when I pulled a couple of the frames apart.  They are amazing creatures for sure.  

~Nick

Thursday, April 24, 2014

Day 1: Video Footage

I went out to the hive the day after installing the package to see what the girls were up to.  I was actually quite surprised.  Tons of bees were leaving and entering the hive and some were even coming back to the hive with full pollen baskets. It was incredible! The video I shot isn't the best quality in the World, but if you have the option to enable HD viewing on the video, I highly suggest it! Enjoy!


~Nick

The Girls Have Arrived!

After months and months of waiting, I finally got my package of honey bees on Tuesday! It was basically the best Earth Day ever. Sky Hive is finally up and running and I couldn't be more happier. I feel like the biggest nerd in the World!  I took some photos of the installation process (they aren't the best quality, but they will do the job).  Surprisingly enough, installing a package wasn't the least bit difficult. However, it took some getting used to having several bees crawling all over your body and buzzing around your face.  A veil, suit, and gloves are a must! Enjoy the photos!

Setting up the bee yard for the package installation
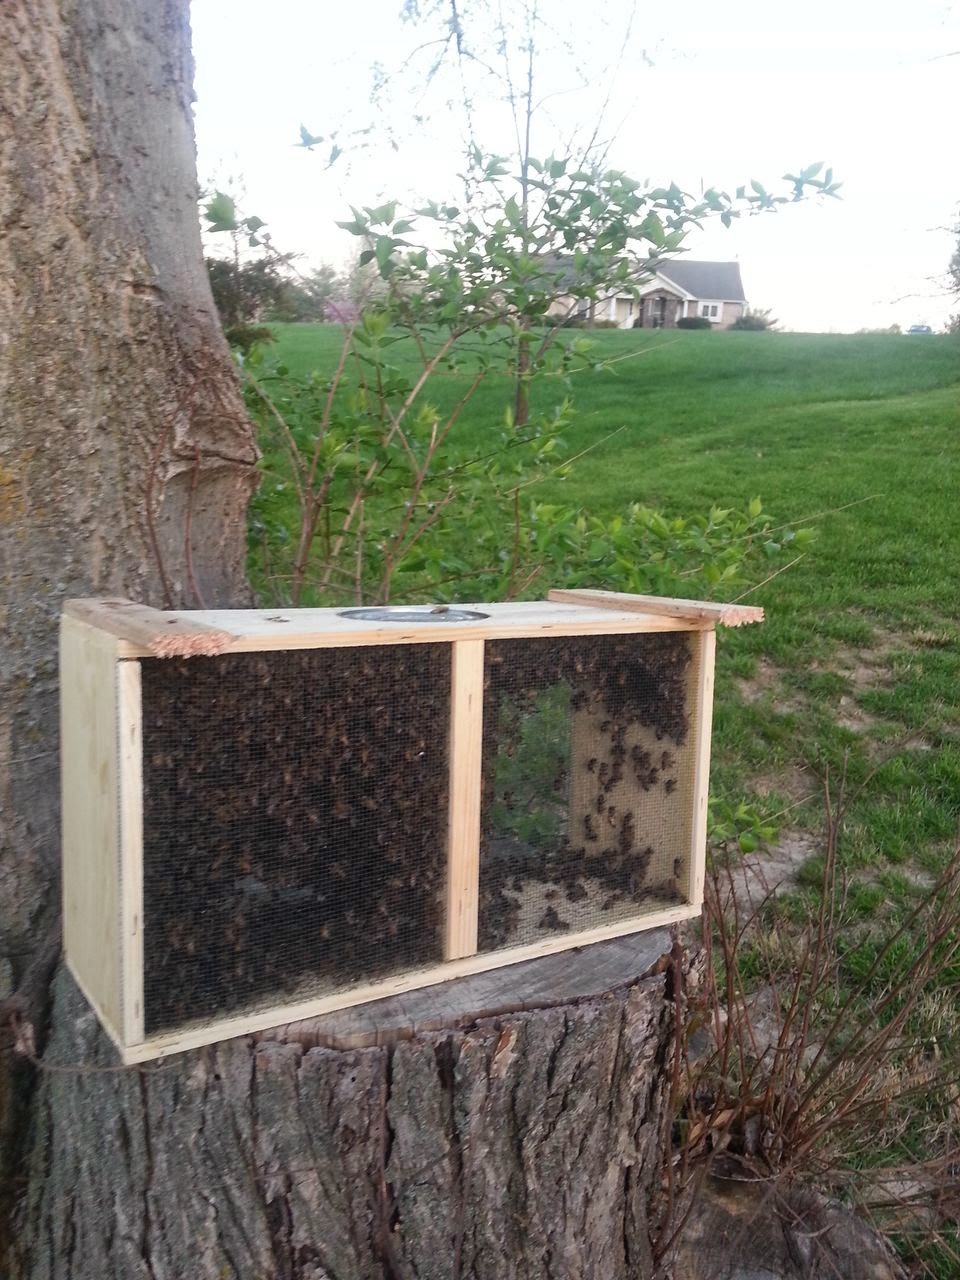
My 3lb package of Italian honey bees. The packaged bees normally come in a wooden box with two screen sides,  a circular cut in the top where a metal can full of sugar syrup sits, a queen cage dangling inside, and approximately 10,000 or so worker bees and a few drones.
Once you have about half of the frames taken out of the bottom super, you are ready to start the installation process.  I started by opening the package, removing the can just enough to slide out the queen cage.  You immediately replace the metal can to keep the bees from flying out.
You need to carefully examine the queen cage.  You won't be able to get every bee off the cage. The ones you see on the queen cage are most likely her attendant bees.  They keep her fed and cleaned within the package and within the hive as well.  First you need to see if your queen is actually alive (thank goodness, mine was). Check to make sure the queen isn't limping, walking slow, or acting abnormal.  Mine was zooming everywhere inside the cage and looked perfectly healthy.
Once you examine the queen and deem her fit to rule your colony, you're ready to move on.  Some queen cages have two holes, one on each end on the cage, the top or bottom.  My cage only had one hole at the bottom.  Placed inside the hole is typically a small cork and a piece of sugar candy.  If yours comes with a piece of candy your lucky, mine did not.  However, it didn't really make things that difficult.  Luckily, my parents had some marshmallows on hand.  I simply stuffed a marshmallow over the hole to block the queen from coming out.  This prevents the queen from being released into the colony too early.  Instead, the colony will eat through the marshmallow and release the queen on their own time.  After you ensure the entrance is plugged with an edible door, you simply hang the queen cage between a few frames in the bottom super.
After you hang the queen cage between frames, you're then ready to install the rest of the package into the hive. First, I sprayed the screened sides of the package with sugar syrup. The sugar syrup calms the bees, distracts them, and makes them sticky, which allows for an easier installation process.  Most people suggest that you first shake out a handful or so of bees over the area where you hung the queen cage.  It alerts the bees of the queen's presence, her location, and allows them to start becoming accustom to her pheromones, which ultimately leads to her release from the cage. Then you can disperse the rest of the package throughout the hive. Since I removed five frames, I dumped most of the bees into the empty space left by the removed frames.
Once most of the bees are shaken out of the wooden box, place the wooden box with the top hole facing toward the entrance of the hive. It allows the few straggler bees to escape the box, smell the pheromones of their sisters and find their way to the entrance of the hive.  Before placing the inner cover over the bottom super, I first laid a pollen/protein patty over the top of the frames. This gives the bees a food supplement giving them the strength and nutrients to start building up comb.
I then inverted the inner cover and placed it over the bottom super. I also added a bucket feeder for sugar syrup feeding.  The lid of the feeder has several tiny holes poked in the lid and when flipped over it causes a vacuum within the bucket which only allows syrup to drip out when the bees lick it from the holes. 
I placed the bucket feeder over the hole of the inner cover which allows the bees to crawl up to the perforated lid and feed off the syrup. Then most experts suggest you use an empty deep super to conceal the feeder to prevent robbing and to further protect your bees and hive. 
Finally, I placed the outer cover on top of the hive and cleaned up.  Everything went very smoothly and quite quick!
~Nick

Monday, March 24, 2014

Painted & Ready for Tenants

April is almost here!  I am about one week away from obtaining my first package of honey bees.  I hope the weather cooperates...  Speaking of Sky Hive, I am happy to announce that the hive is completely painted and ready for bees!  Abby did an amazing job.  The thought of painting a hive seems easy, but actually doing it, is another story.  It took a little over a month to complete, but the wait was totally worth it!  Thanks again, Abby!

Below I am going to post a few pictures from the painting process.  Leave some comments and tell me what you think!

Let the fun begin.  Coffee is a must.
Applying the first base coat.
Applying the first base coat to the supers.
Medium and deep supers with first coat completed.


Chevron stenciling complete                                                                                 Opposite side of Chevron stenciling


Completed hive. Fully painted.

 ~Nick